 One of the new features in the latest release of NCover is Condition Coverage. It is the result of both customer requests and our desire to provide a deeper understanding of how thoroughly code has been tested. Condition Coverage is also great tool for those clients who operate in regulated industries where demonstrating a thorough testing plan is not only a great business practice, but a prerequisite for licensure or other regulatory approval.
The Basic Methodology of Code Coverage in NCover
The NCover methodology of code coverage has traditionally organized the code into the following hierarchy:
- Modules contain namespaces.
- Namespaces contain classes.
- Classes contain methods and properties.
- Methods contain branches.
- Branches contain sequence points.
These are simple subdivisions and aggregations within the coverage metrics provided by NCover. The coverage methodology has been to track the execution of sequence points and branches and aggregate those into summaries for the containing Methods, Classes and so on. NCover defines a branch to be a set of sequential instructions which must execute in order without an opportunity for branching in the IL. Individual steps (usually each line of code) within the branch are sequence points.
In this breakdown, the elements behave like pins on a map. There is no indication of how code execution arrived at this location, simply that at some point it was executed. Further knowledge of the code in question as well as the testing context must be considered by the user to know how execution arrived at that point in the code.
Condition Coverage
NCover’s Condition Coverage provides more of that detail and narrows the gap of understanding needed to decipher what’s missing in a test. To understand Condition Coverage, we need some basic concepts of how methods are broken down by NCover during execution.
To review, Branches are made up of Sequence Points and Methods are a collection of Branches. Conditions determine how the branches within a method interact. Every method is comprised of at least one branch with an entry point and an exit point (or points) for every branch.
The terms “in-edge” and “out-edge” are used to describe how a branch is entered and exited. The combination of the exit point of one branch and the entry point of another is determined by Conditions.
The “Conditions”
To understand Conditions, it is important to remember that every out-edge leads to an in-edge in the execution graph. The combination, or the set, of an out-edge plus an in-edge constitutes a single Condition. The term “edge” is more descriptive because an entry point to a branch may have multiple in-edges when viewed in the context of an entire method. In addition, a Branch can also have multiple out-edges. While each branch is a distinct set of instructions, it is possible to reach a branch through a variety of combinations of these “in-edges” and “out-edges.”
A Simple Example – Method 1
To better understand out-edges consider the simplest of logic constructs, the if statement:
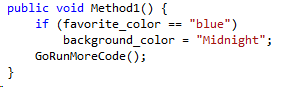
The expression in this if statement will evaluate to either true or false. This evaluation creates a branch. Following the “true” branch will set the background_color before executing GoRunMoreCode(). Failing the condition and following the “false” branch will skip setting the background_color and move directly to GoRunMoreCode(). These two possibilities create two out-edges for the IF statement. The failing edge goes directly to GoRunMoreCode() and the true edge will lead to setting the background_color; the end of the if block will also have an edge that leads to GoRunMoreCode().
When viewing IL, branching typically happens in a single instruction and most commonly is limited to two ways of exiting that instruction. A switch statement in IL is also a single instruction, but it is an example of the type of instruction which has a minimum of two out-edges and will ultimately have a total number of out-edges defined by the case statements in the code. These case statements generate their own out-edges as well.
Every out-edge has to land somewhere. An out-edge typically leads to either the next instruction or a branch offset to a new location in the code. In Method1 our shared destination is the instruction to GoRunMoreCode(). Method1 calls GoRunMoreCode() either after setting the background_color, or even if that condition is not set. It is at this destination that the Condition Coverage is reported. Condition Coverage reports the arrival at a new branch from the out-edge of another branch. Hovering over a line of code or a node in the branch graph will cause the edges connecting to that branch to be drawn. In addition, the coverage toaster in the lower right of the NCover GUI will show the x of y conditions counter.
A More Detailed Example – Method 2
Let’s now consider how this gets much more difficult and more important. Consider the following switch statement:
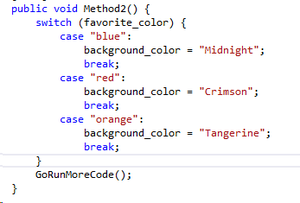
The switch statement in Method2 magnifies the same pattern we saw in Method1. All roads lead to Rome, or in this case to GoRunMoreCode(). From the coverage output below, we see that the switch statement adds six more branches, but look further at the Condition Coverage comparison. The simple IF structure produces two out-edges that subsequently execute GoRunMoreCode(). The SWITCH statement produces five out-edges that then run the same branch containing GoRunMoreCode().
Remember, NCover defines a Condition as one possible combination of out-edge to in-edge of a given branch. In Method1 there are two out-edges which branch to the same in-edge at the instruction to GoRunMoreCode(). Looking at Method2, there are five in-edges that lead to the calling of GoRunMoreCode().
Visual Representation of Condition Coverage in NCover
This should become clearer as we look at a visual representation of code coverage for the source code for both Method1 and Method2 using NCover.
NCover shows us the following for Method1:
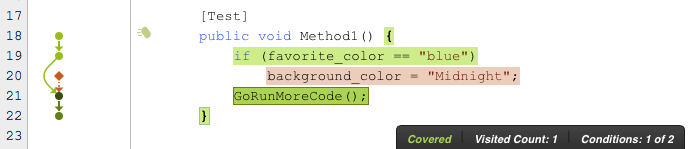
As you can see, there are two Conditions and in this test only one of the conditions was met.
Now, let’s look at Method2:
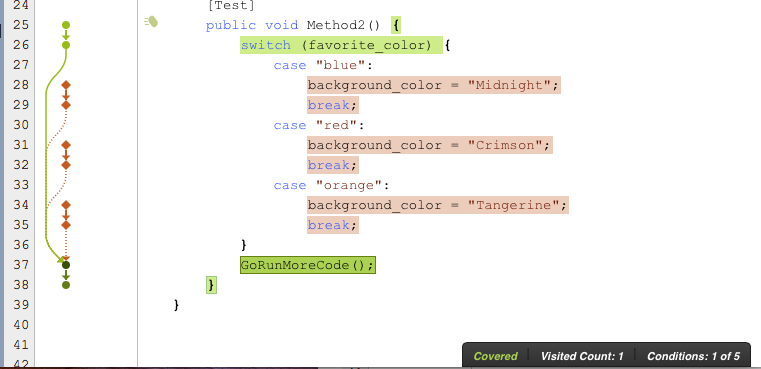
In Method2, we find additional branches and now a condition count of 5. Notice the line drawn in branch visualization.
A solid red line represents a Branch that was not followed.
A dotted red line represents a Condition that was not followed.
A solid green line indicates that ALL Conditions through that connecting vector were followed.
It is possible to get a dotted green line as well. A dotted green line indicates multiple Conditions exist at that connecting point, but not all were followed.
NCover has added this distinction between Branch Coverage and Condition Coverage to highlight these previously hidden scenarios when sets of branches can be followed, but not through all the possible conditions that lead to that branch. This is most helpful when a method is executed under coverage by multiple tests. These tests together may cover the entire method from a branch coverage perspective, but still not meet all conditions.
Rewriting Method2 in the following way shows that we can achieve both 100% Branch Coverage and 100% Sequence Pt Coverage and still not achieve 100% Condition Coverage. This simple test case does not reveal the criticality of such a testing failure, but it does reveal the ease in which it can be created.
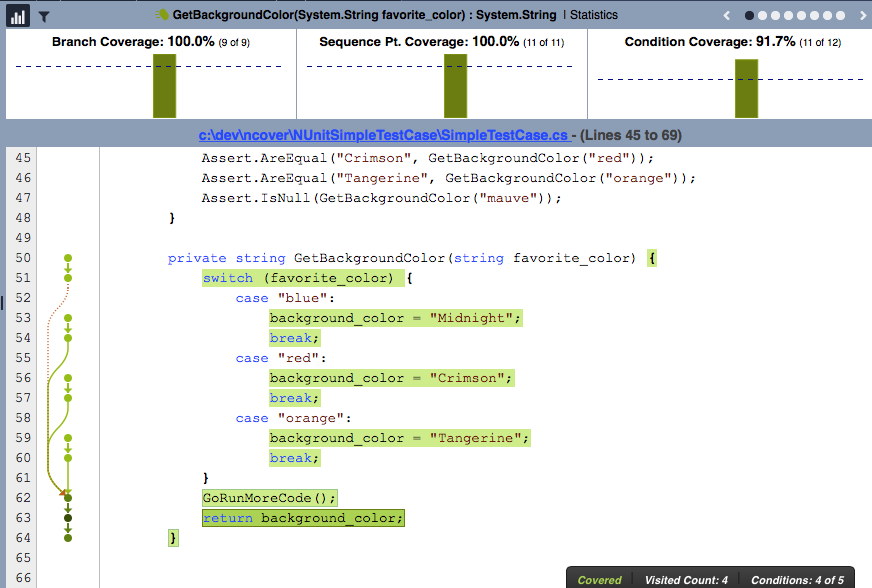
In order to identify what condition was not satisfied, we can highlight the GoRunMoreCode() method call. Highlighting shows that GoRunMoreCode() has a visit count of 4, but the we also see that there was still a 5th condition which was not covered. Without Condition Coverage we would happily accept 100% coverage numbers as a job well done. 🙂
Now that we have Condition Coverage we see the fault of our ways. That uncovered condition triggers a dotted line. In this case, that dotted line goes all the way to the top of the method from the inception of the switch statement. Since each case statement shows as fully covered, we can deduce that the unmet condition is a hidden case. In this example, we have no default case. Switch statements can be even more complicated when a hidden branch is created for values which are not valid for the switch statement to handle. Prior to the latest version of NCover, the above analysis was not possible.
If you would like to try the above examples, here is the source code written as an NUnit test fixture:
[TestFixture]
public class CriticalCondition {
string favorite_color;
string background_color;
private void GoRunMoreCode() { }
[Test]
public void Method1() {
if (favorite_color == “blue”)
background_color = “Midnight”;
GoRunMoreCode();
}
[Test]
public void Method2() {
switch (favorite_color) {
case “blue”:
background_color = “Midnight”;
break;
case “red”:
background_color = “Crimson”;
break;
case “orange”:
background_color = “Tangerine”;
break;
}
GoRunMoreCode();
}
[Test]
public void Method2b() {
Assert.AreEqual(“Midnight”, GetBackgroundColor(“blue”));
Assert.AreEqual(“Crimson”, GetBackgroundColor(“red”));
Assert.AreEqual(“Tangerine”, GetBackgroundColor(“orange”));
Assert.IsNull(GetBackgroundColor(“mauve”));
}
private string GetBackgroundColor(string favorite_color) {
switch (favorite_color) {
case “blue”:
background_color = “Midnight”;
break;
case “red”:
background_color = “Crimson”;
break;
case “orange”:
background_color = “Tangerine”;
break;
}
GoRunMoreCode();
return background_color;
}
} // end test fixture
[…] Condition Coverage (Kerry Meade) […]